🚀✨ I am in your pipeline, decorating it with compliance 🛠️🔒

Back in 2022 I wrote a blog post I am in your pipeline reading all your secrets!
about how secrets can be leaked in Azure Pipelines.
I think it’s time to offset that blog post and have a look at how compliance of all pipelines in a single Azure DevOps Project
can be achieved. This is done by using a feature called Pipeline Decorators
.
What are pipeline decorators?
In most organizations there are certain required compliance and security policies. For example; to be compliant with corporate policies a static code analysis tool must to be executed on all pipelines before executing the actual pipeline tasks. This is where pipeline decorators come in, pipeline authors don’t need to remember to add that step. We as Azure DevOps Organization owners create a decorator that automatically injects the step into all pipelines during their runtime. Ensuring on an Azure DevOps Organization level that all pipelines are compliant with our organization’s policies.
If Pipeline Decorators are so awesome why isn’t everyone using them and why isn’t this feature widespread in the community?
But don’t worry, we got this! Trough this blog post we will learn in a step by step manner how to create and publish our own pipeline decorator using the Microsoft Security DevOps Task
. This free to use task is a collection of static analysis tools aimed at enhancing the code quality, security and compliance of the development lifecycle. So to double down on the earlier given example we are going to implement it as part of our Pipeline Decorator.

Pipeline Decorators types
There are two types of pipeline decorators:
- Build Decorators
- Release Decorators
The Build Decorators apply to Classic Build Pipelines and to the newer YAML Multistage Pipelines.
The Release Decorators, instead, apply ONLY to the Classic Release Pipelines.
Since the Classic Release Pipelines are being deprecated, we will focus on the Build Decorators and consider the Release decorators out of scope.
Decomposing a pipeline
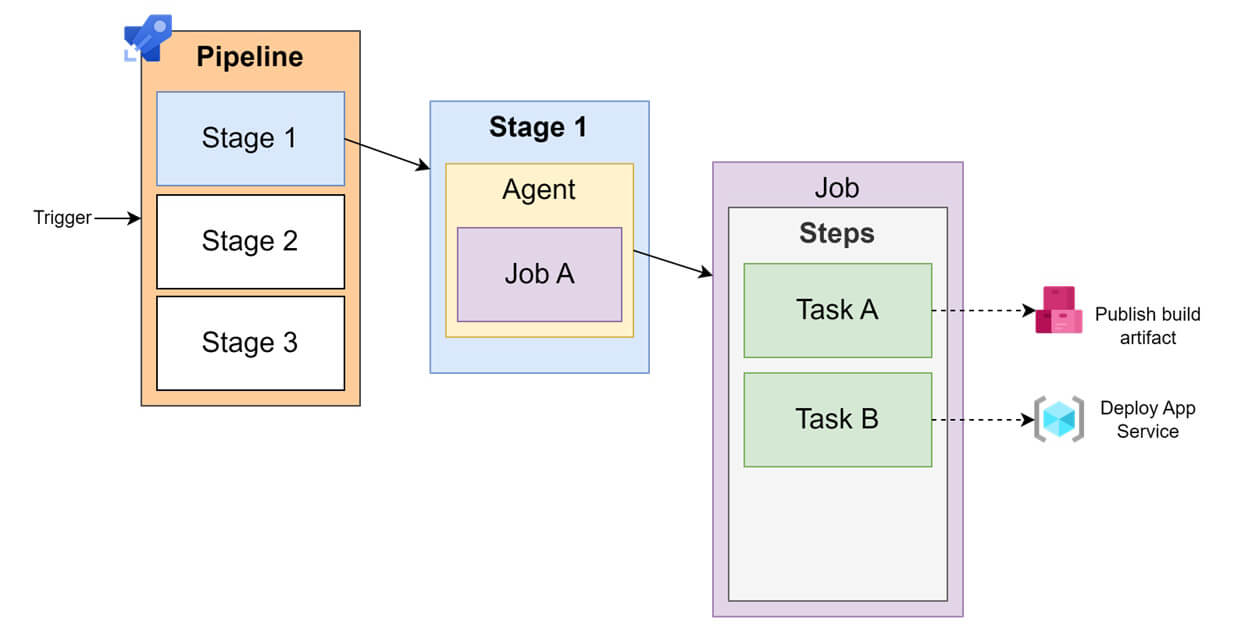
To make sure everyone is on the same page let’s quickly recap the YAML Multistage Pipelines composition.
As show in the following image, a YAML Multistage Pipeline is composed of one or more stages, each stage is composed of one or more jobs (jobs are executed on an agent), a job contains steps and each step is composed of tasks.
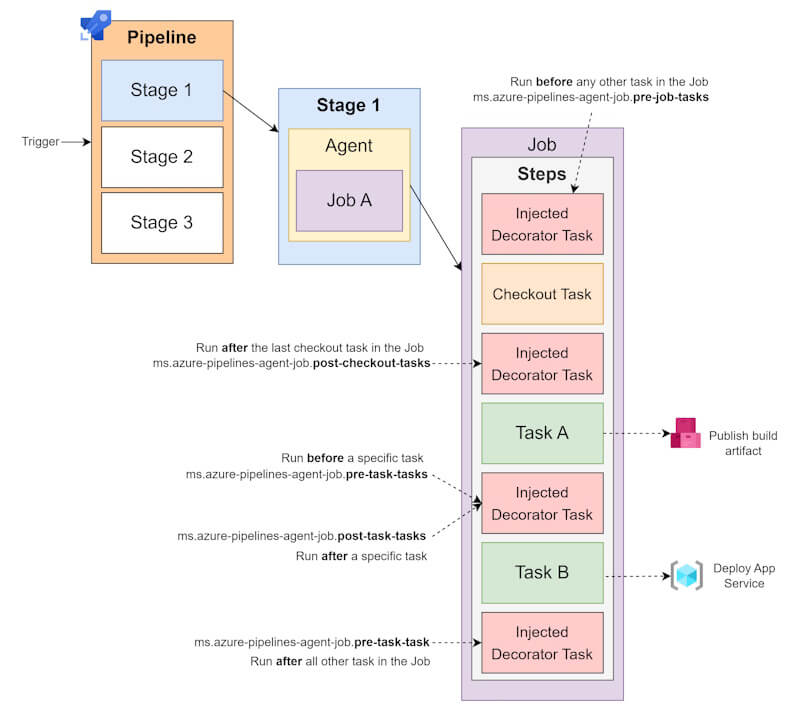
Injection options
Pipeline decorators inject steps to the beginning, the end of every pipeline job and before and after a certain task. The injection point is defined by the target property in the decorator configuration.

The following targets are supported for YAML Multistage Pipeline:
| Target | Description |
|---|---|
ms.azure-pipelines-agent-job.pre-job-tasks |
Run before other tasks in a classic build or YAML pipeline. |
ms.azure-pipelines-agent-job.post-checkout-tasks |
Run after the last checkout task in a classic build or YAML pipeline. |
ms.azure-pipelines-agent-job.post-job-tasks |
Run after other tasks in a classic build or YAML pipeline. |
ms.azure-pipelines-agent-job.pre-task-tasks |
Run before specified task in a classic build or YAML pipeline. |
ms.azure-pipelines-agent-job.post-task-tasks |
Run after specified task in a classic build or YAML pipeline. |
Lets decorate your pipelines
First lets make sure we are all set by checking the following prerequisites.
- Get our VS Code or any other code editor ready and create a new folder. Preferable one that is source controlled!
- Make sure the identity we are using is a member of the
Project Collection Administratorsin ourAzure DevOps Organization. - Make sure we have the Microsoft Security DevOps extension
installed in our
Azure DevOps Organization. - Make sure we have Node.js installed on our machines.
- Install the packaging tool (TFX) by running this command:
npm install -g tfx-cli
Create the decorator extension
-
In the folder we created as part of the prerequisites initialize a new npm package manifest by running hte following command. A
package.jsonfile has been created in your directory, it describes the libraries required by the extension. -
Install the Microsoft VSS Web Extension SDK package and save it to our npm package manifest by running hte following command. The
vss-web-extension-sdkpackage is now installed inside the node_modules subdirectory. This SDK includes a JavaScript library that provides APIs required for communicating with the page our extension is embedded in. -
Inside the folder we created as part of the prerequisites we create a file named
vss-extension.json. Next we copy the following content into this file. -
Now we replace the placeholders in the
vss-extension.jsonfile with your own values, we can use the example values provided in the table for our lab. Full details on all available attributes can be found at the Extension manifest reference .Placeholder Value UNIQUE_ID_OF_YOUR_EXTENSION This is the unique id of your extension, typically a string consisting of lowercase letters, numbers, and hyphens. For example: microsoft-security-devops-decorator OUR_PUBLISHER_ID Our publisher ID of the Visual Studio Marketplace Publishing Portal. Leave it empty for now as we will create it later on NAME_OF_OUR_EXTENSION The name of our extension. For example: Microsoft Security DevOps Decorator DESCRIPTION_OF_OUR_EXTENSION A brief description of what the extension does. UNIQUE_ID_OF_OUR_CONTRIBUTION Contribution id, typically a string composed of lowercase letters, numbers, and hyphens. It must be unique within the scope of the extension.For example: microsoft-security-devops-decorator-task. OUR_YAML_TEMPLATE_FILE_NAME.yml The name of the YAML pipeline file that contains the decorator itself. For example: run-microsoft-security-devops.yml. WarningThe attributepublicmust be set for false for extensions containing decorators. Otherwise the extension wont function. -
Lets create a new file in the same folder named
run-microsoft-security-devops.yml. We need to make sure the name aligns with theOUR_YAML_TEMPLATE_FILE_NAME.ymlplaceholder you replaced in thevss-extension.jsonfile. Copy the following content into this file. This is the actual decorator that will be injected into all pipelines. We will cover it in more detail in the following chapters.
Package and publish the decorator extension
Since the only way to deploy a Pipeline Decorator is by packaging it as an extension and publishing it to the Visual Studio Marketplace a publisher account is required. This is part of our next steps.
-
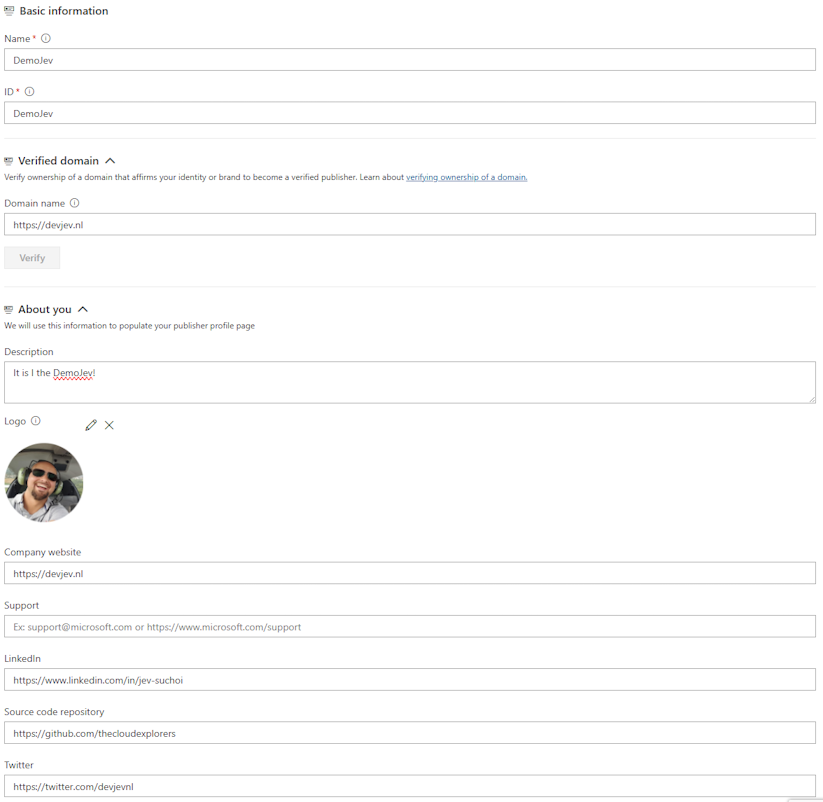
We start with creating a publisher by signing in with a Microsoft identity to Visual Studio Marketplace Publishing Portal At the very minimum we need to provide a Name and an ID, which is sufficient for a lab set-up. When we are creating this for production scenario’s populating all the fields including a logo is strongly recommended.
The ID must be unique across the whole Marketplace. Note the ID down as it’s going to be needed next. Have a look at the following image for an example.
Create your publisher example -
Open the
vss-extension.jsonand replace theOUR_PUBLISHER_IDplaceholder with the ID from the previous step. -
Package the extension by running the following command from the folder you created as part of the prerequisites. If no errors are shown you should see the included output. A new file should have been created in the folder with the extension
.vsix. This is the file that needs to be uploaded to the Visual Studio Marketplace. -
Navigate to the management page of the Visual Studio Marketplace Publishing Portal
-
On the top horizontal bar, select
New extension>Azure DevOps. The following pop-up will appear.
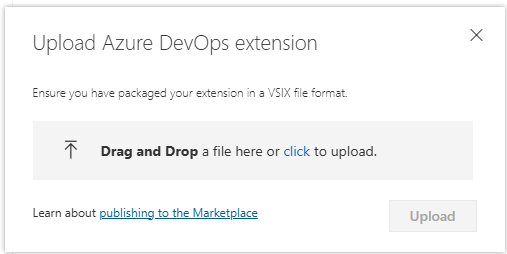
Upload the extension -
Drag and drop your file or select it to find your
.vsixfile, which you created in the previous packaging step, and then choose Upload. A validation process will start, if everything is correct you will see a green checkmark and the option to save the extension.
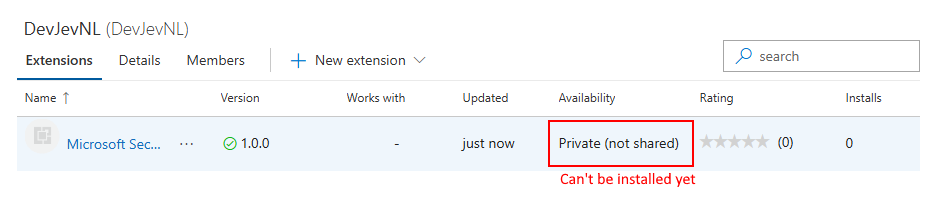
At this point, your extension isn’t visible to any accounts and can’t be installed until you share it.
Extension ready for sharing InfoMicrosoft runs a virus scan on each new and updated extension package published. Until the scan is all clear, we cant publish the extension in the Marketplace for public usage. This way Microsoft also avoids surfacing inappropriate or offensive content on the Marketplace pages. -
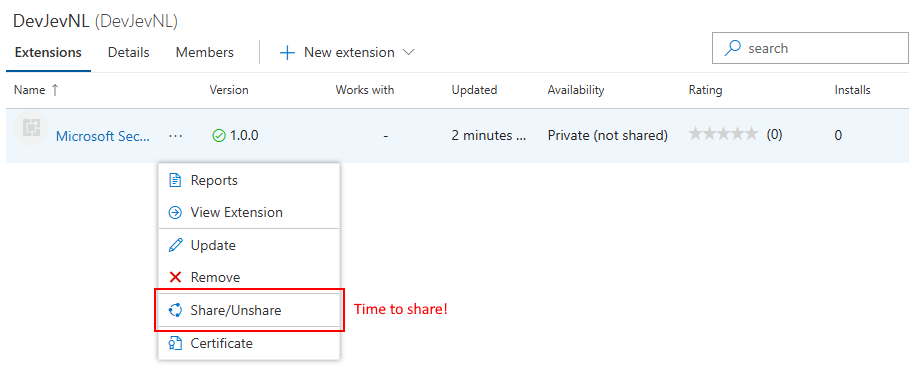
Now lets share our extension with our organization. Select the extension we just uploaded uploaded. Click on the … located just behind the name of the extension and select
Share/Unshare.
Share extension -
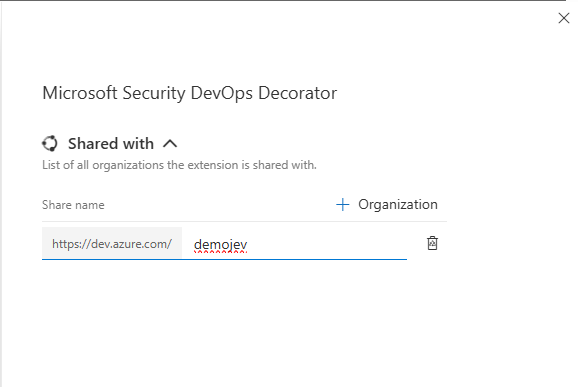
Click on the
+ Organizationand fill in ourAzure DevOps Organizationname. As show in the following image.
Share the extension with our organization NoteThe extension is shared with our organization and our organization only. Meaning in can only be installed into our root organization and not in any other organization. It’s possible ot share it with additional organizations by repeating this step. -
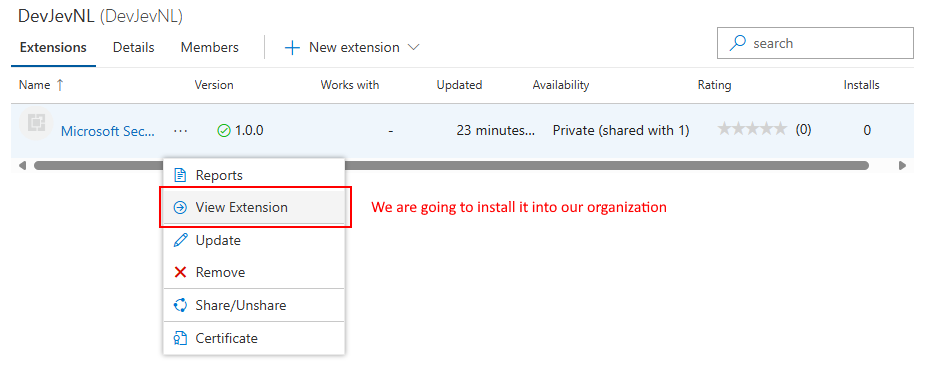
Next lets click again on the … located just behind the name of the extension but this time select the
View Extensionoption.
View the extension -
Click on the
Get it freebutton to install the extension in ourAzure DevOps Organization.
Install the extension -
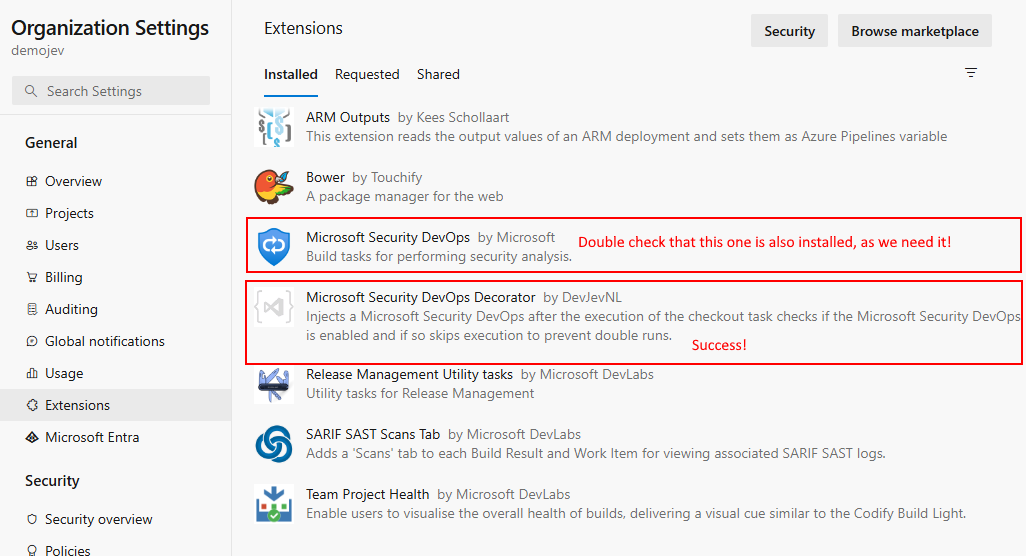
Lets verify our results by navigating to the
Organization Settings>Extensionsand verify that the extension is installed.
Success

Now that everything is in place, we can test drive the decorator by creating a new pipeline and see the decorator in action. However to fully understand it’s inner workings we need dissect the run-microsoft-security-devops.yml file.
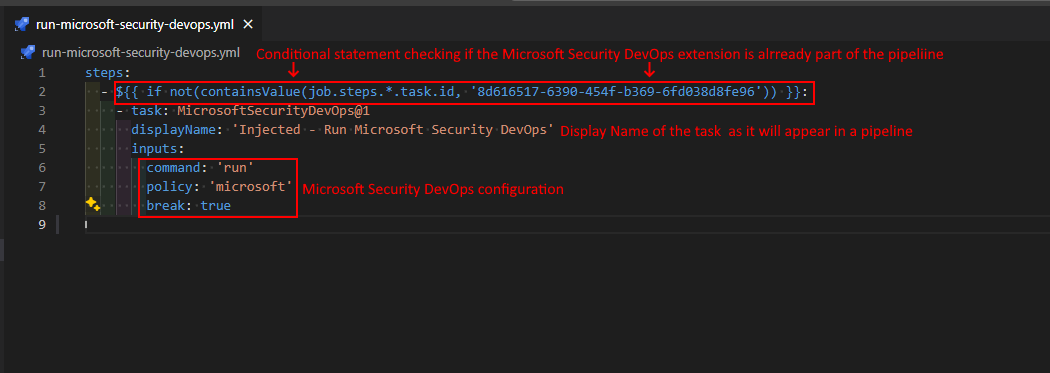
Dissecting the run-microsoft-security-devops.yml
The run-microsoft-security-devops.yml file is a YAML file that contains the decorator itself. Since a decorator injects a task this is exactly what we see defined in the file. In our case we inject the execution of the Microsoft Security DevOps task we go from the Visual Studio Marketplace. However any type of task can be injected, including a Bash or a PowerShell script task. And injecting a combination of tasks is also possible.
Perhaps the most interesting thing to note is the conditional statement on line 2. This statement checks if the executing pipeline instance already has a Microsoft Security DevOps task declared. Only when it is missing it is injected into the pipeline. This is a great way to ensure that the decorator is only injected once into a pipeline.
To implement such a condition the ID of the task is required. These can be found in the sources of the task in question, inside the task.json file.
The sources of the Microsoft Azure DevOps build-in tasks are located here
. The Microsoft Security DevOps task sources are located here
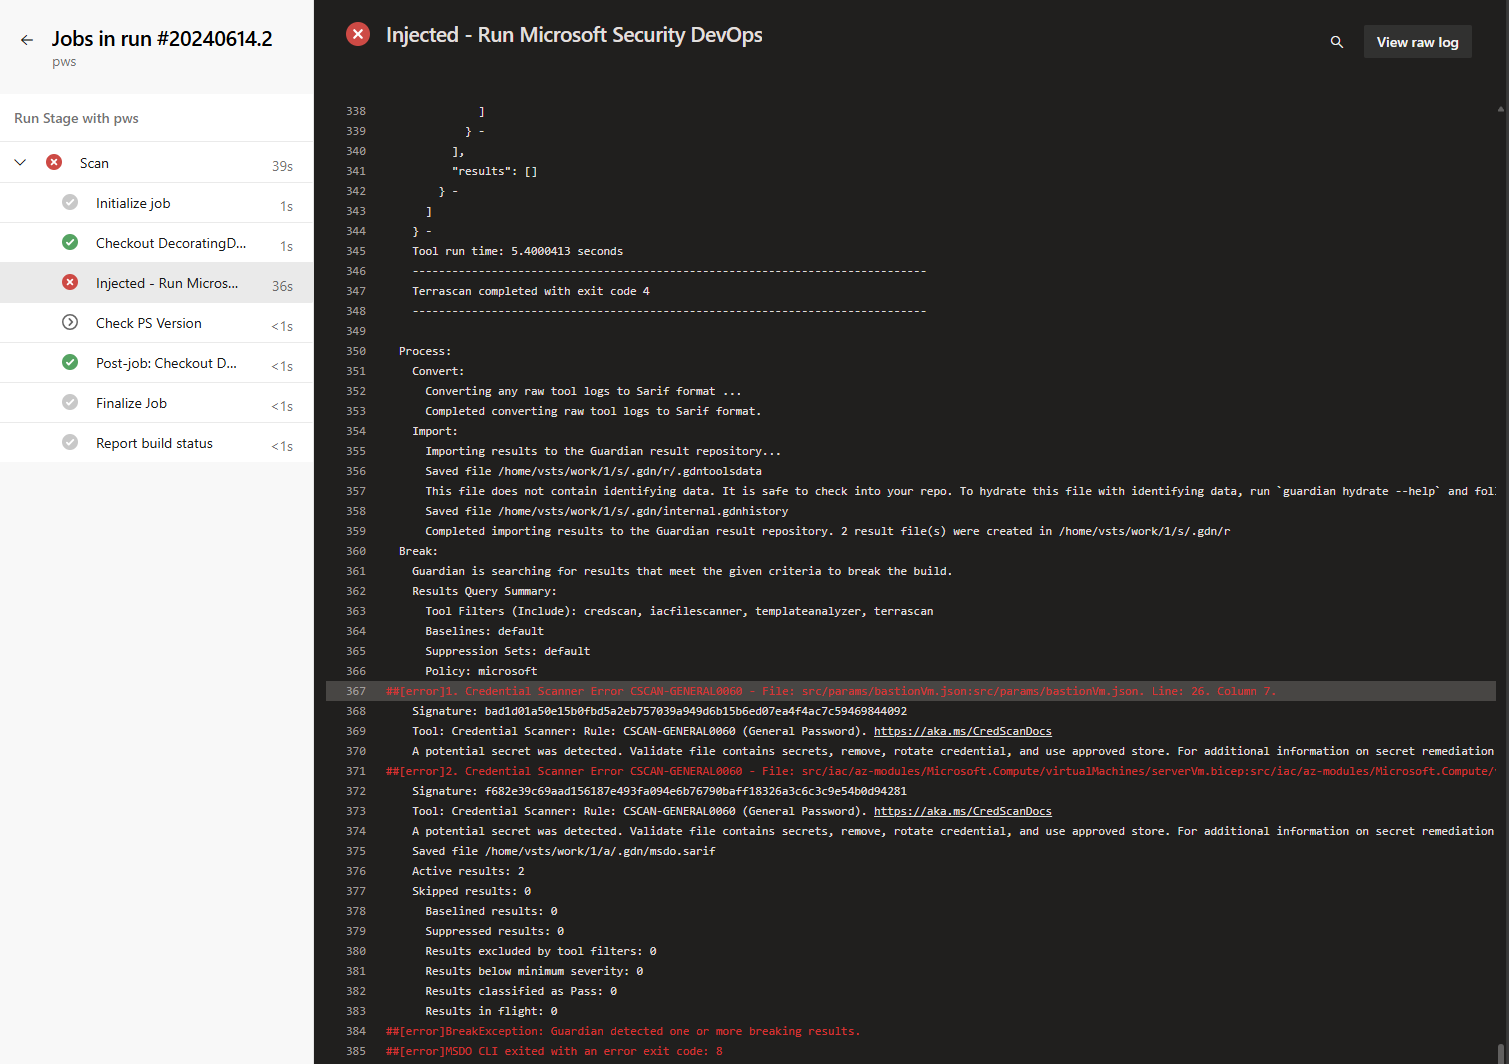
Test drive the decorator
To test drive the decorator, we simply create a Hello World pipeline and run it. See following image as an example, it contains a PowerShell task that echos $PSVersionTable. When this pipeline is run we can see
the decorator in the task list on the left hand side ‘Injected - Run Microsoft Security DevOps’. Note that the task fails this is means that the decorator is doing it’s job,
the repo where this pipeline is part of contains hardcoded secrets.
There are more examples of Pipeline Decorators available at the simply-scripted repo part of the The Cloud Explorers GitHub organization.
Conclusion
There is a wide variety of the applications for pipeline decorators. They can be used to enforce compliance, security, or quality standards across all pipelines in an Azure DevOps Organization. This is a powerful feature that can save a lot of time and effort for the organization’s administrators and developers. There are however three major downsides to using this feature which attribute to the lack of adoption by the community.
- The lack of visibility of the decorators in the Azure DevOps UI (not counting the Extensions view).
- The cumbersome way of creating and managing decorators.
- Decorators are publicly viewable on the Visual Studio Marketplace which could be a security concern even though without permissions they are not installable.
Wrapping up
And that’s all folks! I hope you found this post educational. If you are interested in the reference material used to make this post, please visit the following links.
- Author a pipeline decorator
- Package and publish extensions
- Develop a web extension
- Extension manifest reference
- Microsoft Security DevOps extension
- GitHub Microsoft Azure DevOps extensions sources
- GitHub Microsoft Security DevOps extension sources
As always, a big thanks for reading this post. If you liked it, don’t be shy and have a look at my other posts .